My girlfriends are part of who I am. I don't know what I would do without them in my life. We've shared laughter, tears, wine, food, great stories, days shopping, wine, movie premiers, the triumphs and trials of parenting, parties, wine, and life in general with each other. They are the girls I can talk with anything about. We accept and love each other for who we are. I have shared so many amazing moments with these ladies and I cherish each and every one of them!
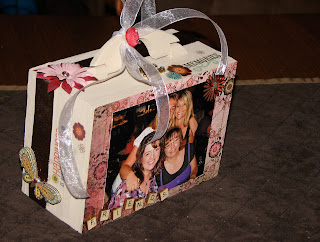
Being a crafty soul, I love to make gifts for family and friends as I really feel it adds a personal touch. One of the gifts I made for a girlfriend(years ago) was a memory box. I purchased a wooden box from a local crafting store, decorated it and then filled it with photos and mementos from years gone by. I loved it and have made similar boxes for family members.
This is a relatively simple gift to pull together. You will need:
*Wooden box - available at most crafting stores. Mine had a latch and handle on it.
*Ribbon - one to wrap around the box and one (thinner) for the handle
*Rub on decals/words.
*Embellishments - I used a variety of items from companies such as K&Company, Jolee's, a brad, fabric flowers, some very cute scrabble style "sticker" letters, and a few other odds and ends. Use your creative energies!
*Mod Podge
*Crafters glue
*1 sheet of scrapbooking paper
*Photos of whatever you are showcasing for box front
*Pictures and memorabilia for inside the box.
To Make:
I traced the front and back of the box onto the paper and then cut it out. Be sure to trace onto the back of the paper. Then apply a light layer of mod podge to the front and lay the paper in place. Allow to dry and then repeat with the back side. If you want a glossy look to the paper, you can put light layer of mod podge over the top of the paper. Just be careful not to overdo it so the paper bubbles. Next cut a length of ribbon to be wrapped around the box(as shown above with the brown ribbon). I glued this ribbon into place. Where the ribbon ends meet, I put the flower over that point. Tie some thinner ribbon(white) around the handle. Again I "spiced" up the knot of the handle ribbon with a little ornamentation. Next I added my photo. Then I put on the rub ons and any other embellishments that I wanted. On the inside of the box I place another rub on saying and rub on flowers. Then I filled the box with some photos and other memorabilia. Done!
The finished product was great. You can easily also paint the outside of the box if you would like too. If you do opt to pain the outside of the box, I would do that first and then proceed. I simply liked the look of the natural wood along with my other embellishments.
Happy crafting!


No comments:
Post a Comment