Walt Disney World is, truly, one of the most magical places in the world. It is also probably one of the busiest places on Earth, but if you are prepared you can make a great experience out of a Day(or two, or ten) at Disney. Growing up, I had grandparents that lived in Florida. So, we were lucky that we got to visit The Magic Kingdom a few times when we were younger. It is especially interesting for me now when I take my children to The Magic Kingdom. It is great to remember it as I did and great to create new memories with my children. Disney is actually in the process of adding new attractions to The Magic Kingdom, but a lot of the park is as I remembered it growing up. I must admit, I kind of miss 1000 Leagues Under The Sea. However, the Pirates of The Caribbean Ride is very "cool". The Swiss Family Robinson Tree is still there, as is The Haunted Mansion, Tom Sawyer's Island, The Country Bear Jamboree, It's a Small World, Dumbo, and The Speedway(to name a few). Over the years I have seen the additions of Splash Mountain, The Adventures of Winnie The Pooh, Pirates of the Caribbean, Monsters Inc, and others. And yes, I have witnessed the revamping of The Enchanted Tiki Room and Space Mountain. The park has seen a lot of upgrades, yet has also kept a lot of its' original charm. I think that holds a special place in the hearts of many people that have been to The Magic Kingdom through the years.

I will always have my favorite rides and experiences though. Included in those are It's A Small World, Big Thunder Mountain, The Haunted Mansion, and Space Mountain. Disney is nearing the end of its' largest ever addition onto The Magic Kingdom. The park is nearly doubling in size Fantasyland. I personally can't wait to see the new additions when we take our daughter later in the year for her 5th birthday. I have loved sharing in this park particularly with my kids. Our older son is now a teenager and, in his words, "too old" for Disney. Me - well, that will probably never happen. But, I do remember sharing some wonderful experiences with him at The Magic Kingdom when he was younger. Now, we can share memories and create new ones with our daughter in this wonderful magical place.

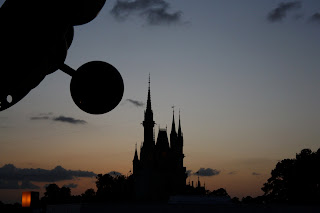
I do have a few recommendations when it comes to The Magic Kingdom park and some things that may help you when planning your next trip. First off is preparing. Traveling to the park with a younger child I always pack an extra set of clothes, a swim suit, and a bag for any clothes that get wet from water. I also pack snacks and sandwiches. I do this every time and have never been told that I can't bring food into the park. Next is your arrival. If you've never been to The Magic Kingdom, be prepared to the "journey" between the parking lot and the park itself. Once you have parked, you will go to (what I call) the crossing area. Here you have the choice of either taking the ferry across a small lake or the tram. I recommend taking the ferry to the park in the morning. A couple of times we've been graced with the viewing of Goofy water skiing! Then, take the tram back at night. It is a nice ride for weary bodies and you get to go through the hotel. Just be prepared for longer lines on the tram if you stay through the fireworks(which are a must of course). Next is actually a step I recommend doing before you even arrive at the park. On Disney's web site you can now print free customized maps of the parks. They help you to highlight the "must see/do" items and they are a great keepsake as well! So, once you've arrived at the parks entrance, pull out your customized park map and get ready for the day. Be sure to check on parade and fireworks times so that you can plan appropriately for those as well as you don't want to miss them! I have found that the two areas that tend to get the busiest are Fantasyland and Tomorrowland. So, I typically head to Fantasyland first, followed by Tomorrowland, and then take it from there. Disney does offer a great ride pass option if you get to a ride that has a long line. Simply find a kiosk, slide in your park entry ticket, and a ticket will be issued for the quicker ride lane for a later time in the day. We also will typically eat lunch at, or near, the Golden Oak Outpost. We find the Dreams Come True Parade time and eat shortly before the parade so we have a good seat for it. The photo above I took from that area.

The Magic Kingdom also offers some wonderful, unique, experiences. Of course there are the many character meet and greets that are spread throughout the park and throughout the day. Disney is now also offering their "Piratical Experience" where, for around $30/person, you enter a special place where you are first given an official pirate name. You are then hijacked off to the Muster Station where your party of Buccaneers is transformed into genuine pirates including beard, scars, earrings, face paint, clothing, and more! The final treasure is a Pirate Portrait to commemorate your Pirate escapade. Another great offering now is the, extremely popular, Bibbidi Bobbidi Boutique. This "Dream Come True" fantasy offers three packages that range in price from $50-$190/person. During this experience, your Fairy Godmother In Training transforms your little one into a beautiful princess or knight. They can choose from 3 hairstyles and they get makeup and a "costume" gown/outfit as well! Many people will follow up this experience with a meal in the Castle. If you would like to do this though, be sure to make a reservation!

The Magic Kingdom truly does offer an experience for nearly everyone. They have attractions that are great for younger ones, rides that provide a thrill factor for older ones, memories from the past for some, and nearly unlimited opportunities to create new memories that can be cherished in the future! Disney even makes it easy to keep photographic memories with their photo cards. Once your first photo is taken by a Disney photographer(they wander throughout the parks), they will give you a photo card. Every time you have your photo taken by and Official Disney Photographer, simply hand them your card and they will keep all of your photos in one place. It takes a couple of days(at times) for the pictures to be available for viewing, but you simply go online and voila - your pictures are ready for your viewing enjoyment and can simply be ordered.

Throughout the year, Disney also holds special events. There is, of course, a separate fee for these events, but they are well worth it! One surprise we had two years ago was during a visit in late October. Upon entering the park, we learned that they were actually doing the filming for the Disney's Christmas Day Parade! Yes, shocker, they film the parade in late November - it's not live on Christmas Day. They stop the parade and do retakes of different parts. But, one of the coolest parts of that day was being part of the crowd that got to watch Mariah Carey perform in front of the castle! A couple other events that are a "Can't Miss" include Mickey's Not-So-Scary Halloween Party, and their Christmas celebration complete with "snow" and creamy hot chocolate to enjoy during the amazing parade!
As the day starts to come to an end, we will typically track down some sort of delectable delight, find a place to sit in front of the castle, and snack as we wait for the night time parade. I have been to all of the major Florida theme parks and I can openly admit that Disney has got the parade thing down to a science. Their parades are, by far the absolute best! I, even today, get a huge smile on my face as the castle lights up and fireworks fly over it! It is one of those sights that one can try to describe, but unless you have experienced it you will never fully understand.
Now I don't know if I can wait another 7 months before our next visit!!!!! Here's wishing you all a very magical and memorable journey!